Panasonic WM61 homebrew microphone design
This is all about saving money, particularly for enterprising but cash-strapped budding recordists. These days you can get a decent recorder for a reasonable price. Good microphones are harder to pick up at knockdown prices. To get a microphone of the performance needed for wildlife sound use is expensive - of the order of about £100 (US$150), and decent wind protection can easily double that.
Fortunately you can save a lot of money if you are prepared to homebrew your microphones and wind protection, but you have to be prepared to do some fairly elementary soldering and mechanical construction work. DIY wind protection is another area where you can lower costs dramatically. Of course you won't be matching the performance of $1000 microphones, but you will be able to come up with something that will give you very good lifelike recordings under good conditions for about £20 in parts new.
The reason for this is that the basic element of a entry level microphone, the electret capsule, is very widely used item in consumer electronics. These are made in their millions by anonymous Chinese factories, finding their way into all sorts of devices, and these can be bought retail for about 30-50p each at the cheaper end of the market.
The part selected for this design is the Panasonic WM61A, an omnidirectional capsule which can be had for about £1.50 each retail in the UK (search ebay, or FEL Electronics will sell small quantities at the time of writing). This part has a number of advantages - it has a known performance, which matches minidisc plug-in-power inputs quite well. The curious may wish to inspect the datasheet The current consumption is low at 0.5mA - other common capsules such as the Rapid Electronics ones can require 1mA which is not available from some of the newer minidisc inputs.
WM61A to unbalanced minidisc jack schematic
Wiring the electret capsules to the minidisc input is straightforward - you simply connect the +ve terminals of each capsule to the tip and ring of the 3.5mm minijack, and wire both -ve terminals to the sleeve of the minijack. You can use standard audio single screened cable of about 5m to connect the mics to the plug - if you use thin enough cable both cables can go into the plug. Alternatively, you can use individual 3.5mm stereo plugs for each mic, wiring one to scrren and tip, the other to screen and ring, and use a 3.5mm stereo splitter (commonly sold for two people to be able to listen on one portable mp3 player). Alternatively you can use mono jacks and use a stereo-to-mono breakout splitter. An example of the electret mics constructed by WSRS member James How uses that technique
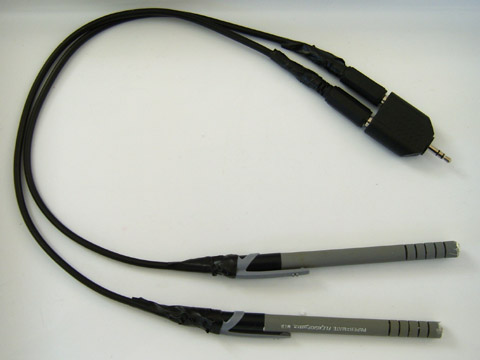
James's solution was to create two mics and use a combiner.
The WM61A mics have been field-tested by two members, Roger Boughton and James How. Because Roger normally uses 48V phantom powered mics and his gear is set up for that I constructed a P48 adapter for the electrets - his description and recordings were made using this adapter and 48V phantom power for convenience. However, you will get very similar results using a card recorderRoger field-tested the mics at home and on Colonsay - his report follows:
A £20 stereo omni pair
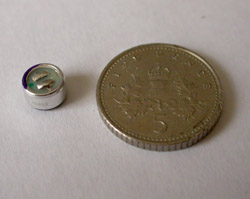
electret capsule and 5p (coin dia
18mm)
An omni is a good first choice for a recordist constructing his first mic [1]. Although you do not get any directionality this makes the omni the least coloured in terms of sound quality, and least sensitive to handling noise. If you do want directionality, you can then use this in a parabolic dish without needing to make another mic.
The microphone is often the most expensive component in the newcomer's wildlife sound recording equipment list. Of the microphones we list in out newcomers' guide, the cheapest is around £70. This article describes an alternative approach, constructing a microphone using the inexpensive Panasonic WM61A electret capsule.
A microphone constructed in this way gives you an omnidirectional pickup pattern, which makes this a good basis for natural-sounding stereo soundscapes. Team this up with a parabolic reflector, and you get an highly directional microphone for single species recording. Your component costs should be less that £20 new, and in practice you should be able to reduce this if you have some common household materials to hand. if you
A
few months ago we created a section on the website called Experimenters
Corner. This followed a set of interesting entries on the
thread
of making microphones and would they be up to the task?
Unfortunately
this thread came to a end, and therefore Richard Mudhar and I thought
we would take up the cudgels and try to make microphones that could be
made by anybody with a modicum of DIY skills. The requirements were
simple - the end result needed to
- Sound OK and
- Be cheap.
His
question of cost was important as we wished to show that with that
little bit of personal effort a person newly interested in wildlife
sound recording could set himself or herself up with the basic
equipment for £100 to £150, and microphones were
given a
£25 budget!
Richard asked me to make
the microphone(s)
as he knew that
- I was pretty inept with a soldering iron, so if I could do it anybody could,
- I have made many comments about the quality of sound some microphones provide, and
- It would make me think about the beginners in the wildlife sound recording game, which as Vice Chairman I should.
We reviewed what
microphone
capsules are available, and initially Richard reviewed a Rapid electronics
capsule
which others around the world had used with some success.
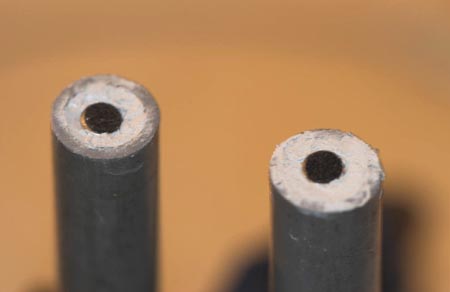
We eventually decided to use a Panasonic WM 61A which is also
well-thought of, which not only gave a
better frequency response, but was significantly smaller (see photo 1),
which would enable us to progress using twins, triplets or even quads
of capsules should we decide so to do. Paralleling up the capsules in
this manner increases the signal level, at the cost of increased power
consumption, without increasing the mic self-noise as much as the gain
in signal.
Another
design criterion was that the microphone should be able to be powered
from a recorder plug-in-power microphone supply. For this to be the case only a single capsule
can be used per channel - the plug-in-power available is not generally
enough to power more than one capsule per channel
Assembly.
What
tube did I have at hand? What diameter should this microphone
be? I adopted some left over plastic tubing. Some
10 mm
external diameter stuff that I proposed to use for a single capsule,
and some 22mm external diameter which could be used for those twins,
triplets and quads, should I ever get that far.
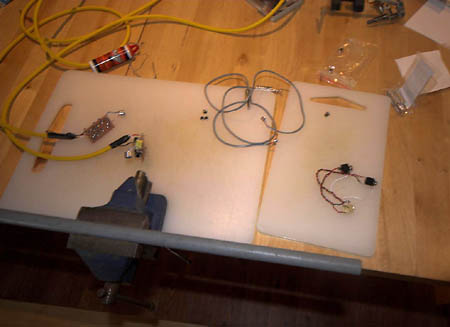
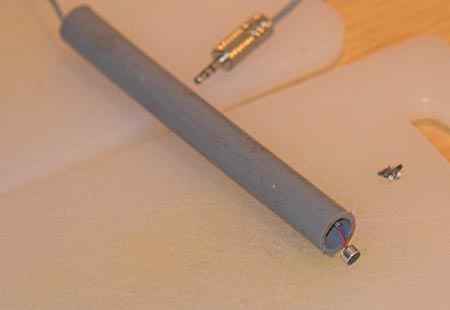
The workplace. The grey plastic pipe is in the vice ready for cutting. In the middle across the two cutting boards are the mic inserts soldered to shielded cable and fitted to 3.5mm jack plugs. on the small cutting board is a small adapter to connect the two mono electrets to a single stereo minidisc input to test the mics. Because Roger used P48 powering, he had to go place the P48 power supply in line to the recorder.
The plastic tubing can be easily cut to the required length, and has the advantage of being electrically insulating, so that any mishaps with bare wires or capsule sides touching the case and shorting things out are avoided.
The capsule fitted to the wire is now threaded through the tube,
For
the ease of using with mini discs, it was decided to terminate the
microphones with a mini-jack flying lead. (In future I will
adapt
an XLR plug at the end of the mics as it presents a more standard
connection, once the 48V circuit is inside the mic.) This flying lead
would eventually need to be attached to the 48v capsule powering
circuitry and that circuitry would need to be attached to my recorders.
So
the tasks would be:-
Solder capsule(s) to 5mm diameter
microphone wire.
Solder mini-jack to the other end of the
wire.
Cut plastic tubing to length.
Carefully
position capsule(s) in tube.
Plug other end of tube to
provide anchorage for the cable.
To
provide anchorage for the capsule and lead I decided to use an elastic
epoxy resin putty, which is available from most model shops, but I am
sure you could use a silicone mastic to do the same job. What
you
must avoid is getting the mastic all over the capsule(s), and we
decided that the capsule(s) should be flush with the end of the tube
with the resin as flush as possible as well.
close up of capsules mounted in the putty
This
“flushness” would give the capsule the best
presentation to
the sound, if sunk in , resonant cavities might exist at mid-high
frequencies
that we would not want. As you can see from the photos I have not yet
worked out any physical sound transparent shielding above the capsules,
details of how I tackled that are here.
Soldering the capsules
which are
6mm in diameter was easier than expected, but having a small pointed
soldering bit helped a great deal, as did a temperature controlled
soldering iron. This is not necessary but proved
useful.
This is not to say that I got it right first time, but a little
practice on other bits and pieces before attacking the capsules
helped. As you can see my soldering still leaves a lot to be
desired!
I needed P48 powering to match my recorders, so I introduced the P48 powering circuit that Richard had made. This enabled me to experiment with parallelling up the capsules for greater output and lower noise.
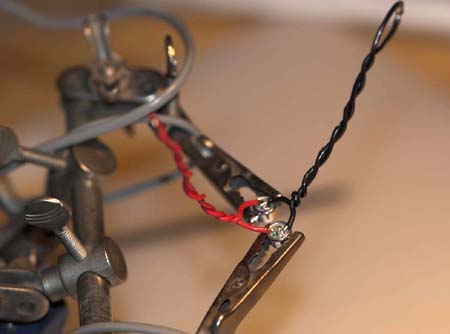
There
are
two tabs on each capsule, one tab is attached to the casing the other
is not. When attaching 2 or more together it is important for
all
the same type of tab to be connected together. I used a table
vice with small crocodile clips to position the pieces before
soldering, and I used an appropriate thin solder wire as
well.
(For those who do this all the time , I apologise for stating things
that you deem obvious. For me they became obvious.)
Once
the capsules were soldered to the cable, the mini-jacks were
connected. The tabbed connection on the capsule connected to
the ring of the mini-jack, and the other capsule connection connected
to
the tip of the mini-jack. The earth of the cable was
soldered
to the sleeve of the mini-jack. (Please note that if
I
used a
metal tube for the microphone, then the cable earth would be soldered
to the metal casing of the microphone as well.)
Now
that
everything was soldered, I checked to make sure everything
worked. When that was achieved the task of positioning the
capsule(s) could begin. The epoxy resin I used, as showed in
photo* came in a circular stick form, like a stick of flexible
rock. You cut off as much as you need and then mix the outer
layer
with the inner, until blended to a uniform colour. You can
then
position the capsule(s) in it, and then position the whole sticky lump
into the tube. Practice does make things better, (certainly
not
perfect yet), and the avoidance of getting the filler on the front of
the capsule(s) is all important. The plug of filler probably
filled the top 20mm of the tube. I finished off the top of
the
filler around the capsule(s) with a small flat screwdriver.
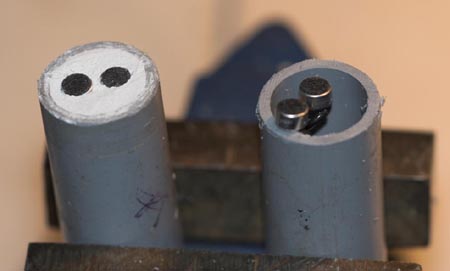
Twin capsules, set in epoxy and just before that stage
Its
worth noting here that the only tools I had apart from the soldering
iron were my leatherman and my Swiss army knife. A decent
pair of
wire strippers and a very sharp modelling knife would have been very
useful, but it just goes to show what you can do with the
basics.
One other thing was that I had a pair of magnifying specs.
Those
capsules are very small!!!
Once the capsules
were
positioned, I checked everything worked again, as the positioning of
the capsule(s) could have created havoc with my basic
soldering.
When checked and working I blocked up the other end of the tube and
allowed everything to set. The epoxy putty I was using was
the
type that does stay a little flexible.

P48 circuit
P48 Phantom powering
Although not required for use with
a minidisc recorder, thinking of the next step up for
recording I asked Richard to provide details of the electronics for
taking a 48volt phantom supply that is provided by most solid state
recorders, and making it usable for the capsules we wanted to use. From
the micbuilders mailing list I found a
circuit diagram purporting to be from
to be from a major microphone manufacturer, which would do the job and
it was this circuit that was used. Richard helped me here by
making up the circuit for me so that I could test everything out within
a decent period of time (see photo, right ).
All
I had to do know was test the newly made microphones. Hear
what you think.
(Listing of recorded cuts.)
My
initial thoughts are that when compared with my bought mics, they are:-
1.
Have a greater self noise.
2.
Do not sound as rounded or as detailed.
But
3. Cost less than £20 a pair.
And,
if I didn’t give the A-B comparisons, would you have found
the sound acceptable.
To conclude these
“hand made” microphones would provide a beginner
with a more than adequate collector of sounds.
For
the person who already has “quality” microphones
they would
provide the basis of a “disposable” microphone, one
that
can be left in a hazardous place with little worry about it being lost
or broken.
In the future attention of finding a
cheap
solution to the problem of wind shielding as the results without it, as
with all mics, would be very disappointing.
Recordings
Listen to some recordings, comparing the WM61A with Roger's much more expensive Schoeps omnidirectional mic in a binaural dummy head.
Wren and robin, WM61A
as above, Schoeps mics
House Sparrows, WM61A
as above, Schoeps mics
Conclusion
I was surprised to find that these performed as well as they did, and I wouldn't hesitate in recommending this route for the cash-strapped recordist who can do the basic soldering. You don't need expensive test gear - a digital multimeter which can be had for about £10 or borrowed is all you need, and the ability to listen. The construction is reasonably straightforward and the results are surprisingly good.
From a purist's perspective, it is possible to nit-pick. These capsules lack audio transparency - when there are a lot of different things going on it is harder to separate the different strands out than with a good mic. They tend to have an uneven response in the high frequencies, which can lend a harshness to the sound or dull the top end, depending on the nature of the response. The sparrows sound a little bit less like individuals and more generic than on the Schoeps. And yet for all that, at the price you can afford to experiment, and you can get into the field and start recording.
The spaced pair technique also lends itself well to large open ambiences - you get some sense of the 'air' of the open forest behind the chaffinch and the spread of the tern colony, even though that is too far away for these mics. The lack of directionality can be frustrating if you are targeting a particular individual, but to address that kind of situation you can team these mics up with a parabolic dish.
There is the natural temptation to see if you can improve the design, and there is much that can be improved. Whether this is a cost-effective route is more questionable. You can get better capsules, but as these are specialised items and you want them in small numbers the costs tend to rise rapidly. One of the favourites is the Panasonic WM-61A which retails at £3 to £5. There is a e-group on Yahoo called micbuilders who aim somewhat higher than I did in building microphones and take a lot more care over the visual appearance.
Constructing microphones can be a fascinating hobby, and I am sure many of the members of that list achieve a much higher performance than this. However, if you are a sound recordist looking for significantly better performance you will probably use your time and money more effectively scanning the secondhand market and saving for something like the Sennheiser ME series, while in the meantime getting out into the field and recording with a pair of these omnis. You will gain valuable experience and some good recordings when the conditions are right, and have a much better idea of what you want to record and how when it does come to making a purchase.
back to the newcomer's guide to wildlife sound recording
- Homebrewing a cardioid mic of this forward facing style is harder than an omni, because a cardioid capsule receives the signal from the back of the capsule as well as the front. It is easy to keep the front of your mic free of mechanical resonances by keeping the front flat, but you have to mount it somehow so there is a much higher risk of colouration from tube cavities to the rear.