Homebrew microphone designs
This is all about saving money, particularly for enterprising but cash-strapped budding recordists. These days you can get a decent recorder for a reasonable price - scour ebay for used minidisc recorders and you may pick up a bargain for about £50 (take a look at the recorder section of our newcomer's guide for what you are looking for). Good microphones are harder to pick up at knockdown prices. To get a microphone of the performance needed for wildlife sound use is expensive - of the order of about £100 (US$150), and decent wind protection can easily double that.
Fortunately you can save a lot of money if you are prepared to homebrew your microphones and wind protection, but you have to be prepared to do some fairly elementary soldering and mechanical construction work. DIY wind protection is another area where you can lower costs dramatically. Of course you won't be matching the performance of $1000 microphones, but you will be able to come up with something that will give you very good lifelike recordings under good conditions for about £20 in parts new.
The reason for this is that the basic element of a entry level microphone, the electret capsule, is very widely used item in consumer electronics. These are made in their millions by anonymous Chinese factories, finding their way into all sorts of devices, and these can be bought retail for about 30-50p each. Or you can scavenge them from broken consumer items that are thrown out, though in that case unless you know the capsules are the same type you should not try paralleling them as this describes.
Before you start, you may wish to skip forward to the audio samples to hear what sort of results you can expect to get. Making these doesn't take long - I constructed the microphones in the afternoon and was out the next morning recording these samples with them.
A £20 stereo omni pair

electret capsule
An omni is a good first choice for a recordist constructing his first mic [1]. Although you do not get any directionality this makes the omni the least coloured in terms of sound quality, and least sensitive to handling noise. If you do want directionality, you can then use this in a parabolic dish without needing to make another mic.
I selected the Rapid Electronics unbranded 35-0190 electret capsules which cost 33p a throw. This project uses four, I bought 25 a while ago. You probably need about six, and you will select pairs on test - six to choose from give you a good chance of getting two adequately matched pairs.
These are rated at a sensitivity of -60dB relative to the old reference level of 1V/µBar which translates to -40dB/Pa (re 1V/Pa) or 10mV at 1Pa. Most good mics are at least twice this sensitivity, but at the lower cost end the sensitivity is typical - for instance the Sennheiser MKE300 is rated at 12mV/Pa which is almost the same. The self-noise is unspecified, which means it isn't great, however I know from experience that these are not too bad in practice.
One trick you can use to reduce the self-noise relative to the signal is to use two in parallel, sited next to each other. The self-noise adds to increase by 3dB but the wanted signal adds to increase by 6dB (the noise is uncorrelated but the signal is). This increases the sensitivity which is welcome at low signal levels [2].
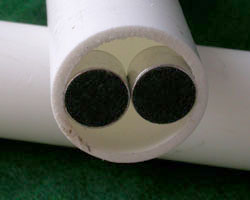
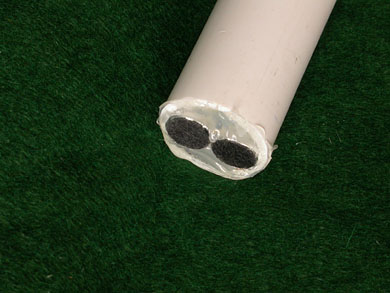
capsules are a snug fit
For the microphone body I used 22m plastic overflow pipe from a local DIY store. A better looking alternative would have been 25mm black electrical conduit - 25mm is a common microphone diameter so many mic clips would fit, and the larger size would have allowed me to parallel three capsules. But I'd have needed to buy 30m of it instead of 2m, so overflow pipe it is.
As you can see from the picture, two capsules are a snug fit in the end of the pipe. Because these are omnidirectional capsules they are sealed at the back, so provided you can contrive a means to seal them into the end of the tube you will get a reasonable result. If you fail to seal them, you will get a horrible colouration to the sound due to the cavity resonance of the pipe behind, a depressing fact I discovered the hard way with my first homebrew mic.
Your recorder may have plug-in-power (PIP), which is supposed to run an electret capsule just like this. In practice the PIP voltage is usually too low and the current available too weak to power one of these capsules reliably, never mind two. The spec indicates a current drain of 0.5mA at a voltage of 4.5V so a pair will draw 1mA, beyond the capacity of many PIP circuits. You can read more about the vagaries of PIP here, but basically this is something you want to avoid. The way to use these is to construct a battery box, which contains a few parts. You can read how to make one here. The battery box is an essential component of the system for using these mics. Commercial electret mic designs often use an internal AA battery and switch instead, but this adds a lot of constructional complexity to the mics, and a battery box allows you to run the mics from an optimal voltage rather than be restricted to the 1.5V of an AA cell.
Schematic of the microphone. In practice BT1 and R1 are part of the battery box at the
recorder end. Particularly in wildlife sound recording, it is nice to be able to change
the battery without having to go to the microphone, potentially flushing the subject.
You need to match the microphone capsule pair in each microphone [3] - to do that connect each one in turn to the input of the battery box and measure the voltage across the capsule using a digital multimeter. The voltage needs to be within 1V of each other. The voltage across the capsule also should be above 5V. Next wire the two electrets together.
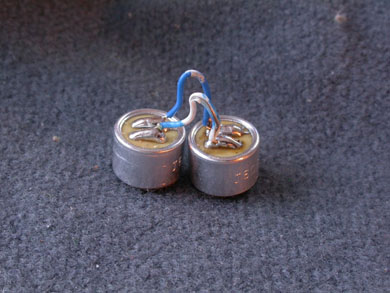
and repeat the measurement - the voltage across both capsules should be more than 2.5V and less than 6V. If this is not the case your capsules draw a different current that the Rapid capsules, and you will need to calculate R1. You ideally want 4V across it with twice the capsule current flowing, so R = 4 / (2 × capsule current).
Once you have done that solder a 1.5m length of single-core audio coaxial cable to the capsules, with the screen going to the terminal connected to the metal cases and the centre core to the other terminals.
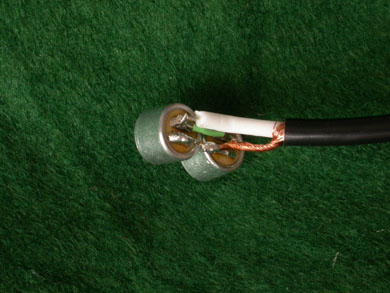
Feed the cable through the plastic pipe, and then push some foam into the pipe to make a snug fit to the cable to stop the tube acting as a resonator. You want a dense closed-cell foam - I used a piece of pipe lagging, which can be cut to slightly bigger than the tube using a craft knife.
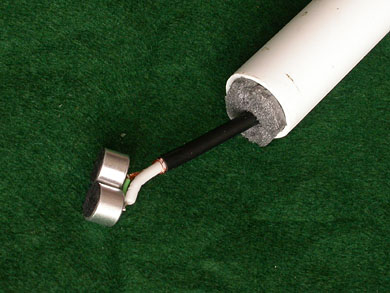
Place the capsules face down on a table and slowly bring the pipe down on top, so they end up flush with the open end. It is important that they are not pushed back into the tube to form a recessed cavity. Fill the end up with something to take up the space - I used hot melt glue, but silicone rubber is probably a better material since you have to be very careful with the hot melt glue - heat can destroy the electret charge on the capsule. The foam behind stops you needing too much of this filler otherwise you would have to fill the whole tube.
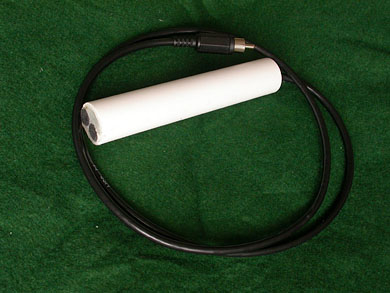
The reason you need as flush a surface as possible is otherwise you will get resonances which will colour the sound - the ideal would be a flat surface flush with the diaphragm. However, if you remove the black material from a sacrificial capsule you will observe that there is already a cavity created in front of the diaphragm to protect it mechanically. Some intrepid mic constructors remove much of the excess using a lathe to even out the rather ragged high frequency response but I am not aiming that high. This is good enough. At the back another piece of foam can be used to keep the exit cable stable, and to put a surface for some more glue to hold the cable in place. Finally, the connector can be soldered to the end and connected to the battery box - you are now in business. Test the mic with your recorder and the battery box - if the performance is up to scratch then repeat the exercise for the second mic of your stereo pair if you want to go stereo.
Commercial microphones usually do not expose the capsule and place a grille in front. To save cost and difficulty I have omitted this. You will need some wind protection, which can give the required mechanical protection normally provided by the grille. The wind protection can be as simple as a cotton sock held on with a rubber band round the tube body and peaked to make a small air gap in front of the capsules. That was good for non-gusty breezes up to about 5mph.
These cost me a lot less than £20, but I had most of the parts already. The bill of materials to start from scratch are
- six capsules (so you can match them) @£0.33=£2
- 22mmx2m plastic overflow pipe £5
- 2m audio single core coax cable £1
- phono connectors one red, one black £0.50
- battery clip £0.10
- small HH1 case for battery box £4
- three chassis-mounting stereo 3.5mm sockets @ £0.16 = £0.60
- 47nF x 2 PE £0.10
- 1uF x 2 PE £0.30
- Sundries (hot melt glue/silicone rubber, foam, craft knife, solder)
This comes to a shade under £15, and I now have two omnidirectional microphones. The proof, however, is in the listening. At this stage you can go out, using the sock over the end of the mic to get some wind protection and record - which is how these clips were made. You can beef up the wind protection in the next stage.
Audio clips
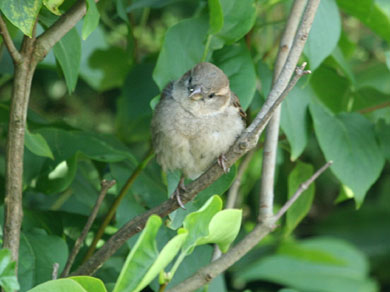
I have many fresh-faced sparrows in the garden at this time of year. They obliged in the morning with the blackbird to supply a test source. I set these mics up on a garden table about 60cm apart as a spaced pair, and rigged a Sennheiser MKH30/40 Mid/Side pair in the middle. At 4:30 am the first sparrow appeared to call in some of his kin. My microphones were fed, via a battery box to a Sony RH1 minidisc recorder. The MKH30/40 was run simultaneously into a Sound Devices SD702. The recordings were transferred, 300Hz Bessel 3rd order high-pass filtered (because the recordings were made in a suburban location and traffic rumble was noticeable even this early). The MKH was MS decoded to return it to stereo and both were clips were adjusted to a similar level.
Sparrow
£20 mics
MKH30/40
More samples
Nightingale (unfiltered)
Chaffinch (unfiltered)
Common Terns (filtered 400Hz HPF Bessel order 5)
Skylarks (there are two in the air at one point - filtered 300Hz HPF Bessel order 3)
Skylark and Bells (filtered 300Hz HPF Bessel order 3)
All these samples other than the sparrow were recorded at Alton water, Suffolk on the 17th June 2007 between 6:30am and 8:30am. I used a cotton sock for wind protection against the 5-9mph wind - it is possible that I would have got a slightly clearer HF response with something better. I used the mics as a spaced pair about 60cm apart. The Nightingale and Chaffinch were within 5m, the tern colony was recorded from a hide looking over the water from about 30-50m away. The skylarks on their own were in flight, recorded by placing the mics on the roof of my car to use it as a baffle for more gain. The Skylark with the bells was made with the mics handheld because I stopped in the middle of putting them away as the bells sounded. While the latter is not strictly a wildlife sound, it does show a reasonable performance to one the classic audio tests - can you still hear a small sound as a larger sound comes into the mix.
Conclusion
I was surprised to find that these performed as well as they did, and I wouldn't hesitate in recommending this route for the cash-strapped recordist who can do the basic soldering. You don't need expensive test gear - a digital multimeter which can be had for about £10 or borrowed is all you need, and the ability to listen. The construction is reasonably straightforward and the results are surprisingly good.
From a purist's perspective, it is possible to nit-pick. These capsules lack audio transparency - when there are a lot of different things going on it is harder to separate the different strands out than with a good mic. They tend to have an uneven response in the high frequencies, which can lend a harshness to the sound or dull the top end, depending on the nature of the response. The sparrows sound a little bit less like individuals and more generic than on the MKH30/40. And yet for all that, at the price you can afford to experiment, and you can get into the field and start recording.
The spaced pair technique also lends itself well to large open ambiences - you get some sense of the 'air' of the open forest behind the chaffinch and the spread of the tern colony, even though that is too far away for these mics. The lack of directionality can be frustrating if you are targeting a particular individual, but to address that kind of situation you can team these mics up with a parabolic dish.
There is the natural temptation to see if you can improve the design, and there is much that can be improved. Whether this is a cost-effective route is more questionable. You can get better capsules, but as these are specialised items and you want them in small numbers the costs tend to rise rapidly. One of the favourites is the Panasonic WM-61A which retails at £3 to £5. There is a e-group on Yahoo called micbuilders who aim somewhat higher than I did in building microphones and take a lot more care over the visual appearance.
Constructing microphones can be a fascinating hobby, and I am sure many of the members of that list achieve a much higher performance than this. However, if you are a sound recordist looking for significantly better performance you will probably use your time and money more effectively scanning the secondhand market and saving for something like the Sennheiser ME series, while in the meantime getting out into the field and recording with a pair of these omnis. You will gain valuable experience and some good recordings when the conditions are right, and have a much better idea of what you want to record and how when it does come to making a purchase.
back to the newcomer's guide to wildlife sound recording
- Homebrewing a cardioid mic of this forward facing style is harder than an omni, because a cardioid capsule receives the signal from the back of the capsule as well as the front. It is easy to keep the front of your mic free of mechanical resonances by keeping the front flat, but you have to mount it somehow so there is a much higher risk of colouration from tube cavities to the rear.
- You can take this further with more capsules and a larger diameter tube, but although noise goes down and output goes up, to my ears the top end becomes more ragged with a papery colouration as you add capsules in parallel. The cost is low, so experimentation is to be encouraged!
- The reason matching is necessary is because the field-effect transistor in the capsule has a wide manufacturing spread leadiding to a large variation of capsule voltage for a given capsule current. Normally this is not an issue - different capsules will simply settle at different voltages. When you force two capsule voltages to be the same you want both to take a reasonable share of the current. Otherwise you will lose the benefits of paralleling the capsules if one hogs all the current, thereby contributing most to the signal voltage across the load resistor.